Showing posts with label home made. Show all posts

Tuesday, 19 August 2014

Healthy chocolate Brownies!


Are you enjoying the Great British Bake off? I have to say I admire all the contestants for entering. Baking is one of those pleasurable activities that feeds the soul as well as body, (my body maybe is being fed a little too much! ) I need a calm kitchen, preferably with a radio 4 comedy playing in the background - while I measure and mix to my heart's content - a long way from the pressures of the bake off tent!  

Unfortunately, I don't have my children at home to eat the result of this soulful activity, so I do turn up to friends houses with my apologetic offerings, (there is usually something that has happened so that the item in question is less than perfect). However, most of the time I just eat it myself... and it must be very fond of me because I believe my cooking has stayed with me - on my hips and waist to be precise! 


The hunt was on, for a way to satisfy my appetite for all things sweet and tasty, without the calories, and I came across this wonderful recipe for low fat chocolate brownies. Most of the fat is substituted by fruit puree, it makes a delicious, rich brownie that is good for you too! Just remember that they do have a little fat and a lot of sugar... or you can simply forget that altogether! 

Healthy Chocolate Brownies


Ingredients
3 oz coca powder
4 oz whole meal flour
4 oz dark brown soft sugar
2 table spoons of melted butter
2 eggs 
2 oz of fruit puree (prune or apricot baby food works or see tip below) 
5 oz dark chocolate roughly chopped
Walnuts or macadamia nuts optional 
Salt to taste 

Method
1 - Pre heat your oven GM 7, 350F or 150 C 
2 -Line a rectangular baking tin (8x6) with baking parchment 
3 - Whisk butter, eggs and prune puree together
4 - In another bowl combine the cocoa powder, wholemeal flour, sugar and dark chocolate until they are well blended. 
5 - Add the butter/egg/prune mix to the dry ingredients but do not over mix
6 - pour into the baking tin and bake for around 35 minutes 
7 - remove from tin using the baking parchment to lift the cake out and allow to cool. 


To make your own fruit puree: soak prunes or apricots overnight in a bowl of water. Then blitz them in a food processor until they are smooth.  


Monday, 9 June 2014

Strawberry fields forever... June Jamming


I love the warm June sunshine - it has been a wonderful summer so far and I am thrilled that it is once again Strawberry Season. 

While I would love to be one of those talented gardeners that grow everything I need, my gardening skills are not that successful! Fortunately there is a lovely pick your own farm not to far from home and my friend D and I headed off there last Sunday. 

Its very companionable moving among the warm straw lines, spotting and picking the delicious red berries among the lush green leaves; the sun warming our backs as the gentle breeze plays with strands of our hair, the easy conversation mixing with birdsong as we catch up on our lives. I love the smell of hay as it rises warm from the sun reminding me of so many good times in strawberry fields: childhood days spent roaming the fields, my own children in competition to find the biggest sweetest ones their chins evidence of the fruit that did not make it to their baskets. There is nothing to beat the taste of a strawberry ripe and warmed by the sun. There are so many wonderful pleasures associated with this small simple act, gathering your own is almost as good as growing your own and the price of the strawberries makes it worthwhile too. 

Of course jam making is a slow process; one that fills my kitchen with the sweet delicious smell while they seep in the sugar. I tried a few new ideas this year as strawberry jam is notorious for not setting well - I was thrilled that I achieved the soft set I was hoping for.

 I have included the recipe here if you want to make some yourself, it is very satisfying to have the jam on the shelf only days after they are picked - it gives me a glorious sense of blissful domesticity. 

I made around 2 1/2 lb of jam (strictly it is a conserve but I call it jam!)

You will need:
900g / 2lb strawberries, hulled. 
900g / 2lb of preserving sugar (it contains pectin which will help your jam to set) 
2 apples
2 lemons 
15g / 1 knob of butter 

A preserving pan 
Sugar thermometer (it really does take the guesswork out of finding the setting point) 
A muslin square  
Jam funnel (it is one of those really useful items that you only discover once you have one!) 
3 medium sized clean jam jars with lids
Wax paper discs 


Layer the strawberries in the sugar and allow to seep, preferably overnight

Peel and then finely grate the apple - place the peel and core in the muslin square and knot tightly to encase the apple then add to the strawberries and sugar. 

Cook over a low heat stirring continuously until the sugar has dissolved, then allow to boil gently for around 5 minutes just enough for the fruit to soften. Turn off the heat and cover with a clean tea towel and allow to stand for another night. 

Before you begin cooking the jam -place two saucers in the freezer, you will need them to be very cold in order to check the jam for setting. 

Sterilise the jam jars by placing them into a warm oven (lowest setting).  This will also mean that the jars won't crack when you spoon the hot jam into them. 

Add the juice and grated rind of the two lemons to the strawberries and place the sugar thermometer on the side of the pan ensuring that it is not touching the bottom of the pan. 

Bring the jam back up to boiling point, stirring the fruit now and then - boil rapidly (the jam will do a rolling motion) for around 5 minutes. Check the thermometer - the temperature should reach about 220 or the 'jam' setting. 

To test for setting -take a small teaspoon of jam and place it on the plate, return to the freezer for a few moments;  the jam should be slightly thick when you push your finger through it. If it remains runny then boil again for a few more minutes and then repeat the test until you are happy with the set. 

Place your butter into the jam and turn off the heat, stir the butter until all the bubbles are gone. 

Let your jam to cool a little (about 10 minutes) so that the fruit will be evenly distributed in the jar rather than sinking to the bottom. 

Ladle into the warm jars and cover with a wax disc. Run a damp cloth round the edge of the jar, this will discourage mould to form. Screw up tightly and allow to cool. 

Label and decorate with fabric and ribbon if you wish; enjoy the warm glow of being a domestic goddess!  

Delicious on a warm baked scone or fresh white crusty bread and butter! 


Friday, 11 January 2013

Saucery in the soup Kitchen

All packaged ready to go


My vegetable delivery comes on a Friday from Able and Cole and the fridge was still full of vegetables, two large butternut squashes, three large red peppers, tomatoes, carrots, 1kg of onions, 1kg of shallots, mushrooms and sweet red potatoes! We were only just finishing up the Christmas food so I decided the best solution was to make soup and some roasted pasta sauce.  

It is more than likely the easiest method for making soup - I chopped the butternut squash, onions,  a clove or two of garlic and sweet potatoes into a large roasting dish, covered them with some olive oil and slowly roasted them for about an hour in a low oven, (gas mark 4). 

I also chopped up the red peppers, tomatoes and some more onions in another pan, smeared basil and olive oil over putting them to slowly cook. Making use of the whole oven, I filled smaller oven bowls with mushrooms & garlic and simply shallots in oil. The only attention it needs is a mix now and then, just to even out the cooking. 

In an hour or so, the vegetables have gone beautifully soft and dense with flavour and the aroma fills the house with a lovely home cooking smell. You can leave them with the oven switched off to slowly cool - for me it intensifies the flavour as I imagine the oils being absorbed into the vegetables as they cool.  

To make soup;
Use your largest pan - sweat off some onions in olive oil, moving them slowly but not over mixing
until they are soft and translucent. 
Add your roasted vegetables ensuring you scrape every last bit of oil from your roasting dish with a spatula - every drop of oil is infused with flavour it is a shame to waste any of it. You can also pour  some of your hot stock  into the roasting tray, this will make sure every last bit of flavour goes into the soup. 
The amount of stock you might need is dependent on how many vegetables you have - you want to aim for one third vegetables two parts stock. I use Kallo organic stock cubes, they don't contain monosodium glutamate, and they give a lovely flavour. 
Allow your soup to slowly simmer, you want to aim for the odd bubble to surface not a rolling boil, leave the lid off and let the soup condense. 

Depending on your preference, you can blend the soup or simply leave it chunky, it is just a case of waiting until you have the consistency you enjoy. Be aware that if you have used salt, the saltiness will increase as the water evaporates - I tend to leave salt out as the stock cubes often have salt in them. 

You can add some fresh chopped ginger, or turmeric, both of which have ant-bacterial qualities which are believed to help immunity.  To give it a really lovely flavour add two or three tablespoons of creme fraiche or yoghurt. 

For the pasta sauce add;
Add a tin of chopped tomatoes to the red peppers and tomato mix, a couple of tablespoons of Balsamic Vinegar, a dash of worcestershire sauce, two teaspoons of brown sugar and then finally the whole mushrooms and shallots. You then slowly re-heat in a saucepan when you want it. Like all good sauces allow the flavours to develop over a day or so, but don't leave it more than three and always ensure you warm it up properly.

You can freeze these in batches, but this must be done as soon as it has cooled.  I decided to take a couple of jars of soup to some friends, they are a great pick me up, full of organic goodness, just what we need during the winter months. 


Sunday, 18 November 2012

Stir up Sunday


I thought I would try and make a Christmas pudding this year; it needs about 6 weeks to mature so I am a little late, Stir up Sunday is usually the first Sunday in November. It is called this because of the tradition where all the family members gather round and stir the mixture and make a wish before the pudding is steamed for the first time and then put aside to mature. 

I am not sure it is something that is known outside these shores, one of my very dear Au Pairs came all the way from Hungary, and she shuddered at the thought of eating Christmas Pudding, mostly because she believed that over the year all the scraps of food would be collected and boiled up to make Christmas Pudding. Of course when she ate the real thing it was something she loved. It really is one of my favourite parts of the meal, and I have been known to stock up on puddings for the year ahead. 

I remember doing this for the first time when I was twelve I used to visit a teacher in her small cottage not far from our home. We lived in a modern house where my mother believed cooking was a necessary evil, however under the quiet guidance of this teacher I learnt the alchemy and bliss you could gain from cooking. I remember her telling me all about stir up Sunday and I helped her measure out the ingredients and making a wish. I also remember making candied peel which tasted sublime and is much better than any type shop bought. It was a completely different lifestyle from my own, she had no television and her house was tiny in comparison to ours, but I would have swapped homes anytime. 

I thought of those days of bliss in the small victorian cottage, and my pantry has large labelled jars holding herbs, jewelled cherries, jam and marmalade. I think I am happiest of all in the kitchen, cooking is the most satisfying easy nurturing activity, right now it is full of the aromas of fruit cinnamon and nutmeg and will remain a day or two as it needs to soak in. 


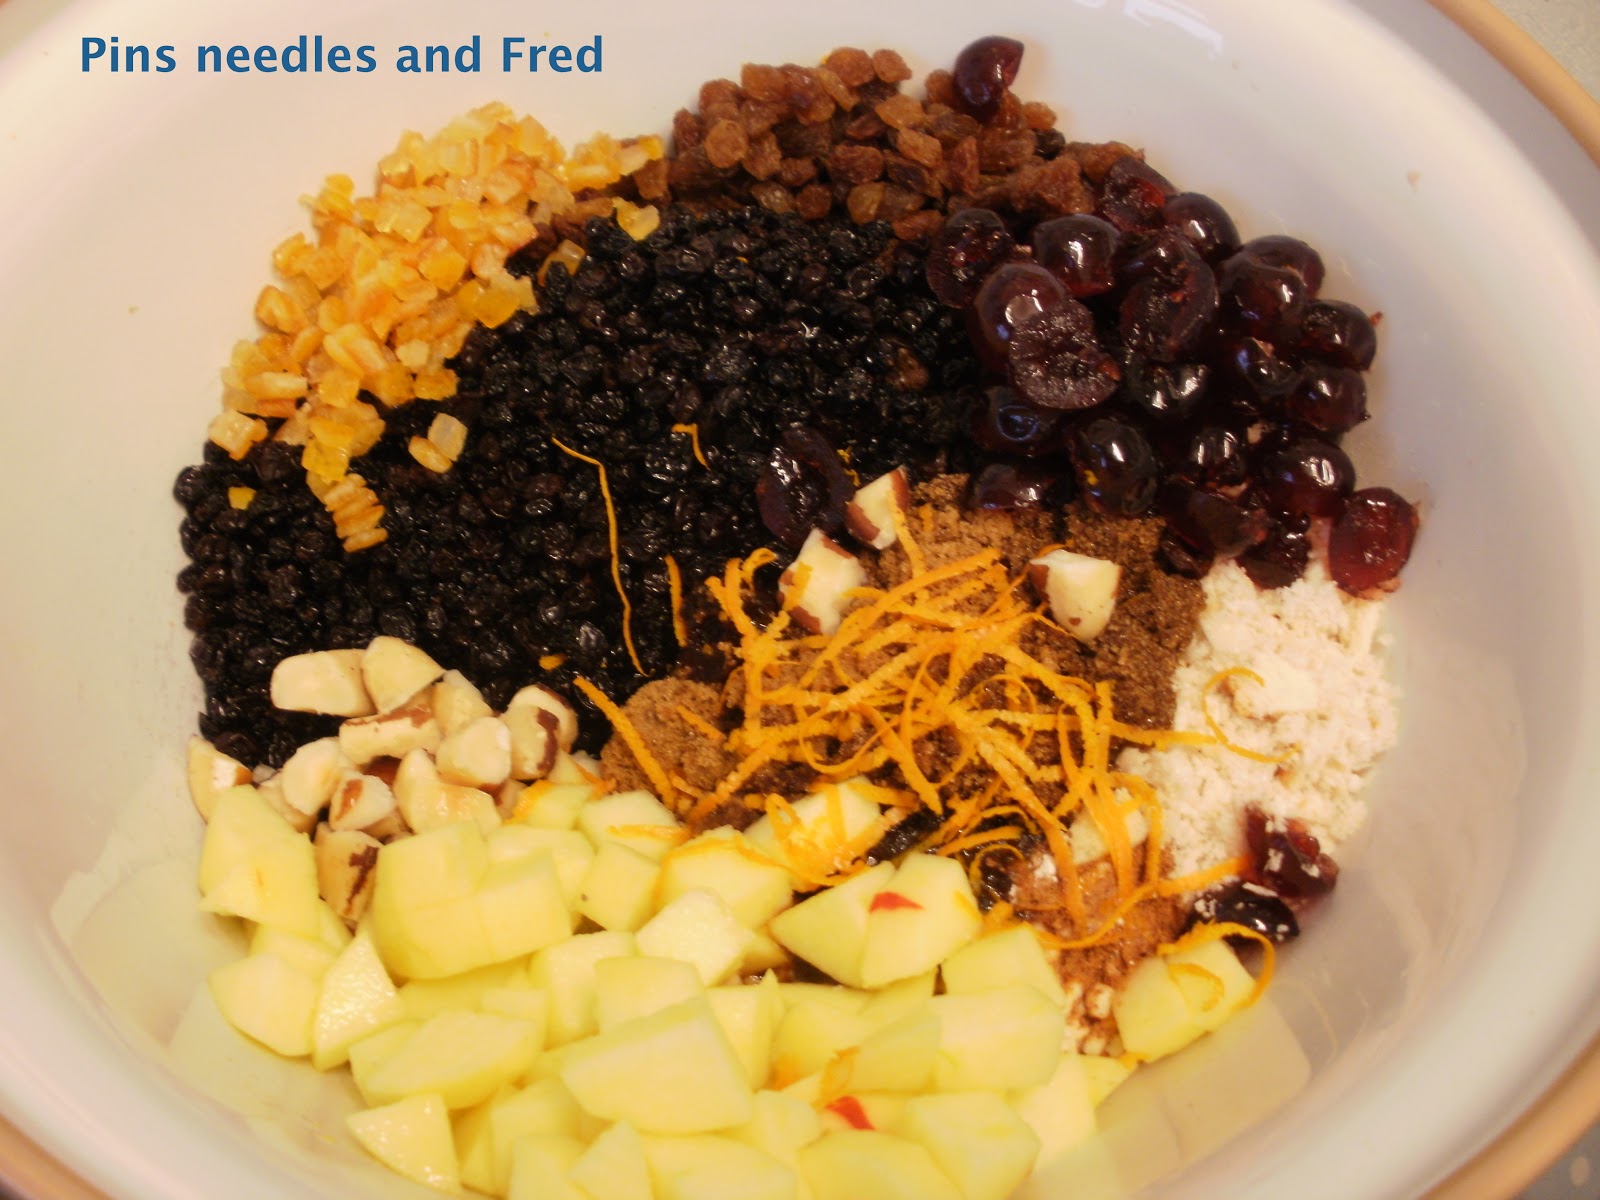
Place in a bowl, (110g) - 4oz shredded suet, 2oz - (50g) of self-raising flour, 4 oz - (110g) white bread crumbs, 1 teaspoon each of mixed spice, ground nutmeg, ground cinnamon. 8 oz (225g) soft dark brown sugar, 4 oz (110g) each of sultanas, raisins, currants and 1oz of candied peel. 1oz (25g) of almonds, 1 small cooking apple finely chopped, Zest and juice of a lemon and an orange. In a separate bowl, put 2 large eggs, 3 fluid oz (75ml) of barley wine, 3oz (75ml) stout, 2 tablespoons rum, mix this together then add to the dry ingredients. Mix thoroughly, this is when the family is supposed to gather, each takes a turn to stir making a wish. Leave the pudding to rest for a day. 

 Spoon the mixture into a pudding basin, and make a tin foil lid. It is important to have a pleat in the lid so the pudding has room to rise. Tie the string round the edge of the basin and create a little handle over the top which will help you to lift out the pudding from the steamer. 


 I slowly steamed my puddings in a slow cooker for around 6 to 7 hours on a low setting. Slow cookers are perfect for steaming, as you can leave them to bubble away without worrying about the water boiling dry. This is how the pudding looks after its first cooking. 


I thought I would make some simple little covers, similar to the jam pot covers. Just an elasticated edge round the circles, but the lovely bright fabric makes them look very nice and festive. It is important to feed the puddings with your favourite tipple weekly, either brandy, vodka or liqueur, the pudding will soak up the alcohol.


 All they need is to be steamed again for about an hour or two on the big day, once again the slow cooker is the best way to let it slowly bubble. 


This is how they look when they are finally cooked, serve with cream or brandy butter. (Butter whipped with a couple of tablespoons of brandy). 


Update: These were really delicious, far superior to the shop bought ones even the 'luxury' brands! Despite feeding two adults not fans of the traditional pud, they proclaimed the puddings 'delicious'. I saved the second one for my birthday, (on the 4th January) and it was still tasty, you can keep one by for the following year topping with alcohol, but I could not wait that long! 

As requested, I have updated this post with the recipe if you want to make them yourself. 

Enjoy, Happy Christmas!


Friday, 2 November 2012

Leek and potato soup


Some things are simply better home made, and no matter how much you pay for soup it really can't compete with the satisfying flavour and wholesomeness of home made soup. 

While you can eat this soup cold as a summer soup, (it is know as vichyssoise) I prefer it warm with bread rolls crisp from the oven. 


Simply take two leeks, wash and trim, then slice finely, then add small cubes of potato, (around two large baking potatoes) allow to cook very slowly in butter, with the saucepan lid on. You can add a generous helping of cracked black pepper. It is this process that is key to making really good soup and if you can allow the leeks to gently cook for around half an hour with just the occasional stir. 

When you feel that the leeks and potato are all soft and mushy, add 1/2 pint of hot vegetable or chicken stock. Turn up the heat slightly and allow the mixture to bubble for around 10 minutes or so with the lid off the saucepan. 

Finally add half a pot of creme fraiche and stir in, waiting for the soup to return to the boil. You can leave it thick and chunky or blend with a hand blender to make it smooth. 

It really is a joy to eat, not just warming and satisfying but good for you too. 


Monday, 15 October 2012

Jamming!


I have been rather remiss of late, these lovely pots of jelly are made from L's apples growing in her garden. We really enjoyed the mint jelly at the Apple fair at West Dean so I thought I would try and make my own. Apples are a great fruit to use in jam making as their high pectin levels set so easily. I had some scraps of this lovely blue rose vintage style fabric which I simply cannot bear to throw away, such a great use of scraps. 

The cow creamer is a burleigh design, and one of my favourites it always makes me smile when the milk comes out of the cow's mouth! The little tea pot on the right is one of a pair my son gave me a few Christmases ago. I really do love blue and white china. 

Apple jelly is great to use with pork, but I decided to omit the mint this time. The cupboard is getting quite full now, but the supply of jars is still coming thick and fast from friends! (I think it is the hope that they will be returned full!) I am planning to start on mincemeat soon, I have never made it before but as A adores mince pies I thought it would be fun to try. 


As you can see my little dresser creates a great back drop for my jam, the little teapot on the right is a lovely gift from my son, and the chicken on the left was something I picked up in the lovely craft village in Broadwindsor a few years ago. I really must get round to painting my dresser soon; I feel it really shows off the shape of the furniture much better, but it is finding the time! Anyway, it is nice to have plans, and the sofa needs a new loose cover first. 


Thursday, 4 October 2012

A case for vintage re-incarnation


I simply struggle to resist the little napkins and tablecloths that are on the shelves of charity shops for pennies. They are the refugees of an era where families all sat round the dinner table and ate with napkins and linen table cloths. I am so pleased that the crisp white linen table cloths had long gone as my children could never keep their spaghetti on a plate! How they managed to keep the linen in such white pristine condition with no washing machines shows they had skills way beyond my abilities even with my eco bubble samsung! 

I love to find new lives for these poor refugees, and this one is a little needle case. You can gauge how small it is by the size of the stitches. I cut round the appliqué leaving a seam allowance and then used a modern vintage styled fabric that was in keeping, fabricland has lots of different varieties at the moment, all thanks to Kath Kidston. I backed it with the extra stiff iron on interfacing you use to make curtain pelmets it gives the needle book a good solid shape. The button was from my stash, and like everything I remember buying it at one of those craft outlets in Dorset, a small sideline for a potter and so lovely. 


Wednesday, 1 August 2012

Strawberry Shortcake Butterflies


A friend of mine gave me a butterfly cutter that came with a cake decorating magazine, I was having a tea party for friends and thought it would make a different version of the strawberry shortcakes. Mine were just a simple outline of a butterfly but you may be able to get the push button ones from a cake decorating shop that does the impression as well as the cut.

You will discover there are two types of shortcake recipes some versions create a softer mix which is added to a shortbread mould, but this recipe requires a mix that can be rolled out.

Many recipes will allow you to use either butter or margarine, but for shortbread it really does have to be butter, it is not only traditional but gives shortbread its taste, using margarine will give you a bland tasting shortbread. I know butter is very expensive compared with stork, but if you are going to the trouble to make something why scrimp on the ingredients?

200g / 8 oz of soft butter (leave at room temperature for a while it makes beating easier)
100g / 4 oz Caster sugar
250g / 10oz Plain flour
50g / 2 oz Semolina

To decorate: Whipped cream, strawberries and a little strawberry jam.
If you are using fresh cream you need to keep them in the fridge until ready to serve, or you could use buttercream.

Cream butter and sugar together until light and fluffy, you will see the mixture gets paler the more you beat. When it drops off the beaters easily it is about right

Using a fork, gradually mix in the semolina and flour until the mixture finally comes together, try not to handle it too much or you will lose the air from the mixture.

Press together to form a large ball and then place on a floured surface.

Flour your rolling pin and roll out until it is about 1/2cm thick.

Starting at the edge of the dough, cut the butterfly shapes out carefully - press into the mixture and then use a fish slice underneath to transfer to a greased baking tray, then remove the cutter. It helps to maintain the shape of the butterflies.

Make in pairs cutting the second butterfly along the middle to divide the top wings, move the wings slightly apart from each other so that they will cook separately.

Using a cocktail stick or a butter knife, make indentations to the wings like a butterfly.

Keep cutting the butterflies in pairs until all the mixture has been used up.

Bake in a moderate oven, 160c / 325F or GM 3 for around 20 minutes, until golden brown.

Do not touch the biscuits until they have cooled a little as they will be very soft and fragile. After 20 minutes or so gently ease them off the baking tray and put them on a cooling rack, until they have cooled down completely. (essential as the cream will run if the biscuits are hot).

Take one of the flat butterfly biscuits and place two teaspoons of cream and half a strawberry on each side, and cover with a small spoonful of jam.

Add another small spoonful of cream in the centre, and then press the inside edge of the wing into the centre cream and allow to gently rest on the strawberry. Repeat for the other side.

Continue until you have created all your butterflies.

You can dust with a little icing sugar if you wish, or some edible glitter, and serve.


Monday, 11 June 2012

Oranges and lemons

 I love marmalade but the best bit for me is the thickly cut rind, and it seems that no matter how expensive the make of marmalade it is more jelly than fruit. 

I like to make my own marmalade, and often double up the number of oranges to make it extra fruity. Hartley's do a  very good marmade, which makes up to 6lb and great value and usually makes it very successful, but I add my own oranges. 

Cut 8 large oranges in half, and extract the juice and then put the oranges in a large maslin pan, cover them with water and bring to the boil for around an hour and a half. Switch off then allow to cool. 

Take the orange halves and scrape out the inner segments and scrape out the white pith. Chop the rind either thinly or thickly to your preference. Using the directions on the marmade, but instead of water use the juice, it really brings out the orange flavour. You can also use jam sugar which has added pectin if you wish, this will help the marmalade set. 


I have been trying out different recipes for cheesecakes, I know the cooked cheesecake is the best for flavour, but no matter how hard I try the biscuit base ends up soggy. so I decided to try a non cook cheese cake using cream and muscapone but to bring out the real flavour of lemons I made some lemon curd. Make the usual digestive biscuit base. It really does make a great mix for a lovely lemon cheese cake, just fold into thick cream and muscapone, mix and then pour on top for a lovely lemony flavour. Home made lemon curd tastes so much nicer than commercial types. zest four lemons, add to 5 and a half ounces of melted butter. Add lemon juice and 1 lb of granulated sugar, heat gently until the sugar has melted and then add four beaten eggs. Stir constantly until the curd thickens up and then put in sterilised jars. 

Will keep up to a month, but keep in the fridge once opened. Of course the lemon cheesecake won't last long at all! 

Follow this blog with bloglovin

Follow on Bloglovin